Headlight Restoration: Wet Sanding to Clear Coat
Permanent headlight restoration guide: why headlights yellow, wet sanding progression from 800 to 3000 grit, polishing, and UV clear coat application.
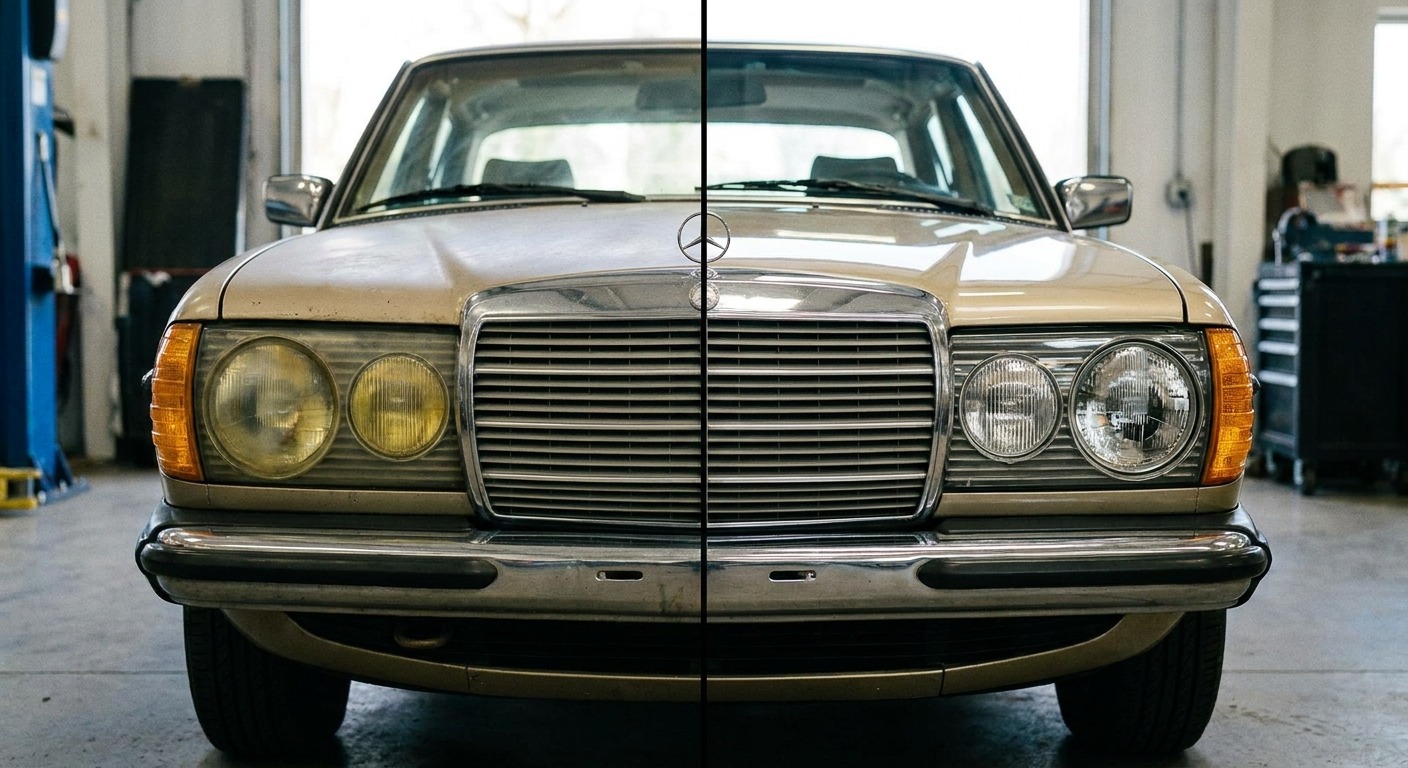
Yellowed, hazy headlights are one of the most visible signs of an aging vehicle, and they're more than cosmetic. Degraded headlight lenses reduce light output significantly — studies have shown that severely yellowed headlights can cut effective illumination by up to 80 percent. That's a genuine safety issue, not just an appearance problem. The good news is that headlight restoration is one of the most rewarding DIY detailing projects. The results are dramatic, the process is straightforward, and when done correctly, the fix lasts years rather than months.
Why Headlights Yellow
Modern headlight lenses are made from polycarbonate plastic, not glass. Polycarbonate is lighter, stronger, and cheaper to mould into complex shapes than glass, which is why manufacturers switched to it decades ago. The trade-off is that polycarbonate is vulnerable to ultraviolet radiation.
From the factory, headlight lenses have a UV-protective clear coat applied to the outer surface. This coating blocks UV from reaching the polycarbonate underneath, keeping the lens clear. Over time — typically five to ten years depending on climate and sun exposure — this factory clear coat breaks down. Once it fails, UV light hits the bare polycarbonate directly, causing a photochemical degradation process that turns the material yellow, hazy, and eventually opaque.
The yellowing happens from the outside in. It's a surface-level degradation of the polycarbonate, which is why sanding and polishing can restore clarity — you're removing the damaged layer to expose clean material underneath. But here's the critical part: once you sand away the damaged polycarbonate, you've also removed whatever remained of the factory UV coating. If you don't apply a new UV-protective clear coat, the freshly exposed polycarbonate will start yellowing again within weeks to months.
This is exactly why store-bought headlight "restoration kits" fail. Most of them include a basic sanding pad, a polishing compound, and either no UV protection at all or a wipe-on UV sealant that degrades in weeks. The restoration looks great for a month, then the yellowing returns, sometimes worse than before because the factory coating remnants are now completely gone.
What You Need
A proper headlight restoration requires:
- Wet/dry sandpaper: 800 grit, 1500 grit, 2500 grit, and 3000 grit. Buy full sheets and cut them to size — it's cheaper and you'll have enough for multiple headlights.
- A spray bottle with water for keeping the surface wet during sanding.
- Masking tape: Automotive painter's tape, at least 2 centimetres wide, to protect the paint and bumper surrounding the headlight lens.
- Polishing compound: A medium-cut or finishing compound and a foam pad. You can do this step by hand with a microfibre towel, but a small DA polisher makes it significantly faster and more consistent.
- UV clear coat: A spray-can UV-protective clear coat designed for headlights or automotive plastics. This is the most important product in the entire process. Without it, everything else is temporary.
- Isopropyl alcohol (IPA): For final surface prep before clear coat application.
Preparation
Start by washing the headlight and surrounding area thoroughly. You're about to sand, and you don't want dirt or debris getting between the sandpaper and the lens surface — that creates deep scratches that take more work to remove.
Mask off the paint, bumper cover, and any trim surrounding the headlight lens generously. You want at least two to three centimetres of tape border around the lens. Wet sanding is controlled, but a slip with 800-grit paper across your painted fender will leave a mark that requires paint correction to remove.
Some people prefer to remove the headlight assemblies entirely for restoration. This gives you full access and eliminates the risk of damaging surrounding surfaces. If the headlight is held in by a few accessible bolts, removal is worth considering. If it requires bumper removal and significant disassembly, working in place with careful masking is the practical choice.
The Wet Sanding Progression
Wet sanding is exactly what it sounds like — sanding with water as a lubricant. The water serves three purposes: it reduces friction and heat, it washes away sanding debris so the paper doesn't clog, and it lets you see your progress as you work.
800 grit — The heavy lifting.
Soak the 800-grit paper in water for ten minutes before starting. Spray the headlight lens with water and keep it wet throughout. Sand in straight, horizontal strokes with even, moderate pressure. Cover the entire lens surface systematically — don't focus on one spot. You're removing the degraded UV coating and the damaged layer of polycarbonate underneath.
The lens will look terrible after this step — uniformly hazy and frosted. That's correct. If you see clear spots or inconsistent haze, those areas need more attention. Five to ten minutes per headlight.
1500 grit — Refining the scratch pattern.
Switch to vertical strokes — perpendicular to your 800-grit direction. This crosshatch pattern confirms you're removing the previous scratches completely. When you can no longer see horizontal marks, move on. Three to five minutes per headlight.
2500 grit — Getting closer to clarity.
Back to horizontal strokes. The lens starts to show translucency when wet at this stage. Two to four minutes per headlight.
3000 grit — Final sanding stage.
Vertical strokes, very light pressure. After this stage, the lens should look nearly clear when wet and show only a fine haze when dry. Two to three minutes per headlight.
Pro tip: The alternating direction between grits is important. It lets you visually confirm that you've fully removed the scratch pattern from the previous grit before moving on. If you sand in the same direction at every stage, you can't tell whether the current grit has done its job.
Polishing
After the 3000-grit stage, the remaining haze is too fine for sandpaper to address — this is where polishing compound takes over. Apply a medium-cut or finishing compound to a foam polishing pad and work it across the lens surface. If you're using a DA polisher, medium speed with moderate pressure works well. If you're polishing by hand, use a firm foam applicator pad and work in small, overlapping circles.
The haze will clear as you polish, and you'll see the lens returning to clarity. Continue until the entire lens is uniformly clear with no remaining haze. This is the moment the project pays off — watching a cloudy, yellow lens turn crystal clear is genuinely satisfying.
Wipe the lens clean with a microfibre towel and inspect under direct light. Any remaining hazy areas need more polishing. Be thorough here — the clear coat goes on next, and any haze locked under the clear coat is permanent.
UV Clear Coat Application
This is the step that makes the difference between a restoration that lasts months and one that lasts years. The clear coat replaces the factory UV protection that you sanded off during the first stages.
1. Surface prep. Wipe the lens thoroughly with isopropyl alcohol on a lint-free towel. This removes any polishing compound residue, oils from your fingers, and contaminants that would prevent the clear coat from adhering properly. Don't touch the lens surface after this step.
2. Confirm your masking. Make sure the surrounding paint and trim are still well masked. Clear coat overspray on paint is a problem you don't want.
3. Apply the clear coat. Hold the spray can approximately 20 to 25 centimetres from the lens surface. Apply thin, even coats using slow, steady, horizontal passes across the lens. Three to four light coats with five to ten minutes of flash time between coats is better than one or two heavy coats. Heavy coats cause runs, drips, and uneven coverage.
Apply the coats in a controlled environment — a garage is ideal. Wind, direct sunlight, extreme temperatures, and high humidity all affect how the clear coat lays down and cures. Temperature between 15 and 30 degrees Celsius with low wind is the target.
4. Cure time. Allow the clear coat to cure fully according to the product directions before driving. Most spray clear coats are dry to the touch in 30 minutes and fully cured in 24 to 48 hours. Don't wash the vehicle or allow the headlights to get wet during the initial cure period.
Troubleshooting
A few common issues and how to handle them:
Orange peel in the clear coat. Mild texture in the clear coat is normal with spray cans. If it's severe, you can wet sand the cured clear coat lightly with 2500 and 3000 grit, then polish — essentially doing a mini version of the restoration process on the clear coat layer itself.
Runs or drips. Caused by applying coats too heavily. Let the clear coat cure fully, then sand out the run with 2000 to 3000 grit and polish. Prevention is easier than correction — thin coats are always the answer.
Haze trapped under clear coat. This means the polishing stage wasn't thorough enough. Unfortunately, the fix is to sand off the clear coat, re-polish, and re-apply. It's a frustrating setback, which is why being meticulous during the polishing stage matters.
Yellow spots still visible after sanding. If the 800-grit stage didn't remove all the yellowing, the damage may extend deeper into the polycarbonate than surface sanding can reach, or there may be yellowing on the interior surface of the lens from UV exposure that penetrated through. Interior yellowing requires lens removal and interior sanding, which is a more involved project.
The entire process — both headlights — takes about two hours for a first-timer. The materials cost under $30. A professional shop charges $100 to $200 for the same job. The DIY economics are hard to argue with.
Why Store Kits Usually Fail
To be direct about this: most headlight restoration kits sold at auto parts stores and big box retailers produce results that look impressive for two to eight weeks and then fade back to yellow. The reason is almost always the UV protection step — either it's absent entirely, or the kit includes a wipe-on sealant that breaks down quickly under UV exposure.
The sanding and polishing components of these kits are often adequate. The abrasive pads and compounds will clear the lens. The problem is the missing or inadequate UV protection afterward. You've sanded off the damaged factory coating and the damaged polycarbonate, leaving fresh, clear, completely unprotected polycarbonate exposed to the sun. Without a proper UV clear coat, degradation begins immediately.
If you've already bought a kit, use the sanding components, skip whatever UV "sealant" it includes, and apply a proper spray UV clear coat from an automotive paint supplier instead. You'll get dramatically better longevity from the same amount of work.
Maintenance After Restoration
A properly clear-coated headlight restoration should last three to five years or more, depending on sun exposure and conditions. To maximize longevity:
- Wash headlights as part of your regular vehicle wash routine — don't neglect them.
- Apply a spray sealant or ceramic spray product to the headlights when you protect the rest of the vehicle. The added UV protection extends the life of the clear coat.
- Avoid automatic car washes with abrasive brushes — they wear down the clear coat faster than hand washing.
- If you notice the clear coat starting to peel or flake after several years, repeat the full process before the polycarbonate underneath has time to yellow significantly. Catching it early means less sanding work the second time around.
Headlight restoration is one of those projects where the before-and-after difference is so dramatic that people notice. It makes the whole front end of the vehicle look newer, and the improvement in nighttime visibility is immediately apparent. It's practical, it's satisfying, and when done correctly with a proper UV clear coat, it's a lasting fix — not a temporary cosmetic band-aid.