Motorcycle Detailing Without Damage
How to detail a motorcycle safely without damaging bearings, electronics, or finishes. Techniques for chrome, matte, powder coat, and chain care.
Motorcycles are not small cars, and detailing them like small cars is how you end up with water in your bearings, blown electrical connectors, and peeling decals. Everything on a motorcycle is exposed. There are no fender wells hiding the wheel bearings. There is no sealed engine bay keeping water away from the ignition system. Every surface is right there, beautiful and vulnerable, and your job is to make it all look incredible without breaking anything in the process.
I have seen well-intentioned riders destroy swing arm bearings with a pressure washer, peel factory decals with the wrong solvent, and turn matte paint into a patchy, glossy mess with standard wax. All of these mistakes are avoidable once you understand what makes motorcycle detailing different from anything else.
What to Never Pressure Wash
Let me be direct about this: a pressure washer is the most dangerous tool in your motorcycle cleaning arsenal. Used wrong, it forces water past seals that were designed to keep water out at road speeds, not at 1,500 PSI from six inches away.
Never direct a pressure washer at wheel bearings, steering head bearings, or swing arm pivot points. The seals on these bearings are lip seals designed to keep road spray out. A direct hit from a pressure nozzle overwhelms them. Water gets in, displaces the grease, and you have a bearing failure that might not show up for weeks or months. By the time you notice the play in your steering head, the races are pitted.
Electrical connectors are the other critical area. Modern motorcycles have dozens of exposed connectors, sensors, and the ECU itself often mounted in a semi-exposed location. Direct water pressure can force water into connectors and cause intermittent faults that are maddening to diagnose. The area around the instrument cluster, ignition switch, and handlebar controls is particularly sensitive.
Tip: If you use a pressure washer at all, keep it at a low-pressure setting, use a wide fan nozzle, and maintain at least two feet of distance from the bike. Better yet, use a garden hose with a spray nozzle for rinsing. The gentle flow is sufficient to remove soap without driving water where it should not go.
The chain and sprockets deserve special mention. On O-ring or X-ring chains, pressure washing can damage the rubber seals between the link plates. These seals hold grease inside the pin and bushing assembly. Damage them and the chain wears out far faster than it should. The SEMA resource library has useful technical data on chain maintenance products. Clean your chain with a dedicated chain cleaner and a soft brush, never with a pressure washer.
Matte Finishes: A Different Set of Rules
Matte paint and matte clear coat have become extremely popular on motorcycles. That flat, stealth-fighter look is gorgeous when it is clean and deeply frustrating when it is stained or damaged, because most traditional detailing products will ruin it.
Standard wax, polish, and compound all contain fillers or abrasives that add gloss to a surface. Apply any of these to matte paint and you will create shiny patches that are impossible to reverse without repainting. Glaze, sealant with gloss enhancers, even some spray detailers will cause problems. You need products specifically formulated for matte finishes, and they do exist from several reputable detailing brands.
For washing, use a pH-neutral soap without gloss enhancers. For protection, use a matte-specific sealant or a ceramic coating designed for matte surfaces. For spot cleaning, a matte-specific spray detailer removes fingerprints and light dust without altering the finish. If your matte paint picks up a scuff or stain, a very light application of isopropyl alcohol on a microfibre cloth often works without affecting the texture. The key principle is: if a product claims to add shine, keep it away from matte surfaces.
Working Around Decals and Graphics
Factory decals and aftermarket graphics are essentially stickers, and they respond poorly to solvents, aggressive compounds, and heat. When detailing around decals, avoid rubbing them with heavy pressure or abrasive products. Never use a clay bar directly on a decal edge because it can catch and lift the corner, starting a peel that you cannot undo.
If the paint around decals needs polishing, use painters tape to mask the decal edges and work up to the tape line. This is tedious but saves you from the expensive alternative of replacing graphics. Machine polishers should stay well away from decal edges because the rotation can heat and lift them instantly. Hand polishing near decals gives you the control you need. For a broader look at how polishing machines and hand techniques compare, our polisher comparison guide covers the key differences.
Chrome, Painted, and Powder-Coated Surfaces
A typical motorcycle has three entirely different surface types that each require different treatment, often right next to each other.
Chrome is electroplated nickel and chromium over steel or sometimes over a base layer of copper. It is hard, reflective, and relatively durable when the plating is intact. Clean chrome with a dedicated chrome polish, which is mildly abrasive and formulated to remove tarnish and light surface corrosion without cutting through the plating. Never use aluminum polish on chrome. The abrasive grade is wrong and you risk cutting through the chromium layer to the nickel underneath, which tarnishes rapidly. We cover chrome care in depth in our chrome polishing guide.
Painted surfaces on motorcycles are typically base coat and clear coat, the same as automotive paint but often thinner. This means less room for error when polishing. Measure paint thickness if you can, and use the least aggressive approach that gets results. A clay bar treatment removes bonded contaminants safely, followed by a fine polish if needed. Heavy compounding should be a last resort on motorcycle paint because there is simply less material to work with.
Powder-coated surfaces, commonly found on frames, swing arms, and wheels, are extremely durable but have a textured surface at the microscopic level that traps brake dust and road grime. Clean powder coat with a degreaser or all-purpose cleaner and a stiff brush. Standard car wax works for protection. Do not try to compound or polish powder coat to a higher gloss, because the texture is inherent to the coating process and you will just create uneven patches of different sheen.
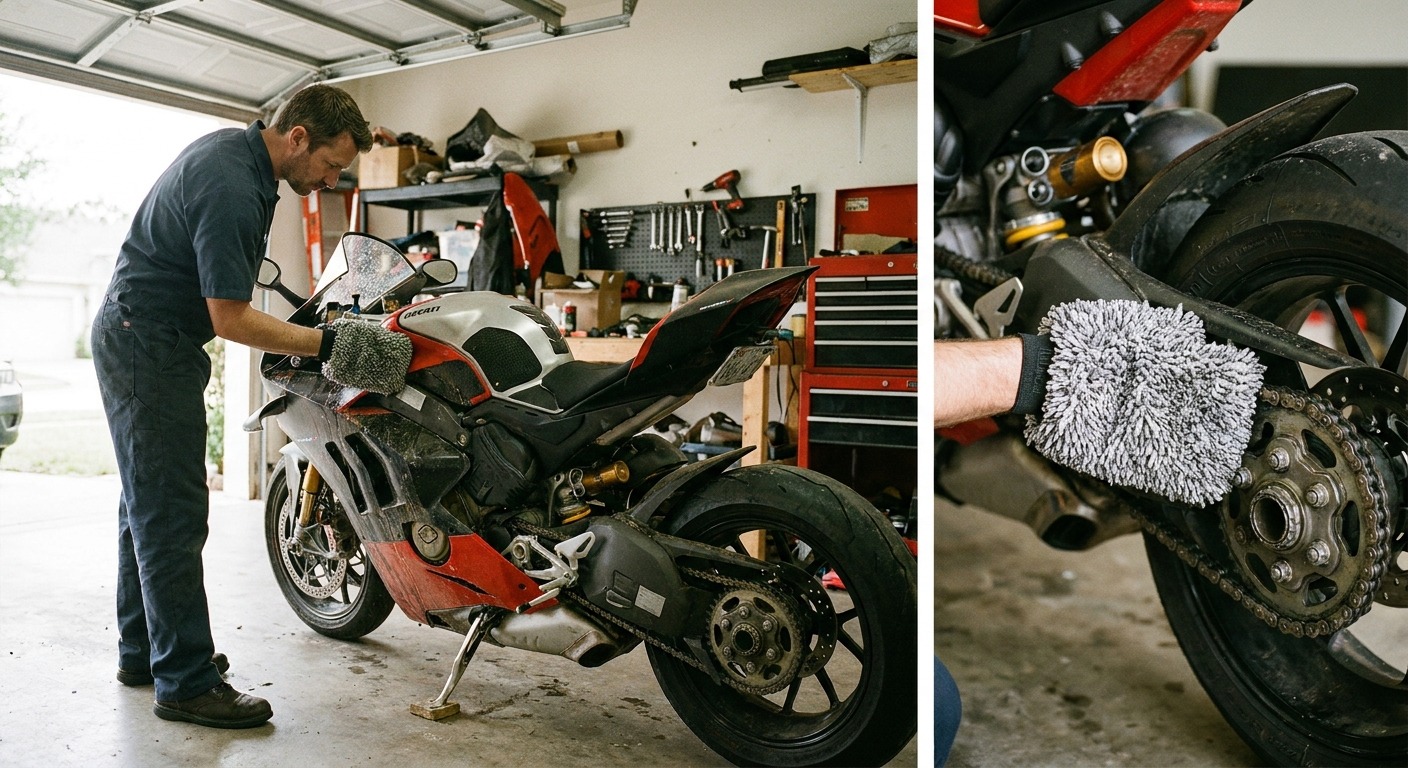
Chain Cleaning: Doing It Right
The drive chain is the grubbiest part of any chain-driven motorcycle, and cleaning it properly extends its life significantly. A dirty chain wears the sprockets faster, reduces power transmission, and flings contaminated lube onto your wheel and swing arm.
- Put the bike on a rear stand so the wheel spins freely. If you do not have a stand, work in sections by rolling the bike forward.
- Apply a dedicated chain cleaner. Do not use petrol, brake cleaner, or WD-40 as a cleaner. Petrol and brake cleaner attack the O-ring seals. WD-40 leaves a residue that attracts dirt.
- Scrub with a chain brush, which has bristles that wrap around three sides of the chain simultaneously. Work through the full chain length.
- Rinse gently with low-pressure water. Let it dry.
- Apply chain lubricant while slowly rotating the wheel. Aim for the inner side of the chain where it contacts the sprockets. Wipe the excess from the outer plates.
Clean and lube your chain every 500 to 1,000 kilometres, or after any ride in rain. In Canadian conditions, road salt in spring and fall demands more frequent cleaning because salt accelerates corrosion of the chain's steel components even with good lubrication.
A properly maintained chain lasts 30,000 to 50,000 kilometres. A neglected one might not make it to 15,000. The fifteen minutes it takes to clean and lube pays for itself many times over in parts savings.
The Full Motorcycle Detail: Putting It All Together
A complete motorcycle detail follows a logical sequence. Start with the dirtiest parts first so you are not splashing grime onto surfaces you have already cleaned.
Begin with the chain and wheels. Degrease the chain, clean the wheels with a dedicated wheel cleaner and brushes, and address brake dust buildup on calipers. Next, wash the engine and frame, using a low-pressure rinse and a brush with engine degreaser on the worst areas. For thoughts on engine cleaning techniques, our engine bay cleaning guide covers compatible approaches. Then wash the bodywork, tank, fenders, and fairings with a quality wash soap and a plush microfibre mitt.
After washing, dry the bike thoroughly with compressed air or a blower before using towels. Compressed air gets water out of all the crevices, bolt heads, mirror stalks, and seams where standing water causes spotting and corrosion. Then towel-dry with a quality microfibre towel.
Once dry, address each surface type with the appropriate product: chrome polish on chrome, paint sealant or wax on bodywork, protectant on rubber and plastic trim. Lube the chain last so you are not handling a greasy chain while trying to keep the rest of the bike clean. The entire process takes about two hours for a thorough job, and the result is a motorcycle that looks like it just rolled off the showroom floor. For broader guidance on surface correction techniques that apply across vehicles, our paint correction overview provides useful context.