Interior Detailing: The Complete Guide
Complete interior detailing guide covering leather, vinyl, cloth, dashboard, carpet extraction, headliner care, interior glass, and odour elimination.
Most people who care about their vehicle's exterior ignore the interior, which is strange because the interior is where you actually spend your time. You look at your exterior for thirty seconds walking to and from the car. You stare at the interior for every minute you're driving. A properly detailed interior isn't just about aesthetics — it's about comfort, air quality, preserving material condition, and maintaining resale value.
Interior detailing is also where materials vary the most. Leather, vinyl, plastic, cloth, carpet, alcantara, suede, wood trim, piano black plastic, glass — each one requires a different approach, and using the wrong product or technique on the wrong material causes real damage. This guide covers all of them.
Start With Removal
Before you clean anything, remove everything that doesn't belong. Floor mats come out. Loose items go in a box. Empty every cup holder, console, door pocket, and seat pocket. Pull the seats forward and back to access debris trapped underneath and behind them. Use a vacuum with a crevice tool to get into seat tracks, between centre console sections, and along the door sill channels.
A thorough vacuuming before any wet cleaning is essential. Applying liquid cleaner to a dusty or dirty surface just creates mud. Vacuum first, clean second. Every time.
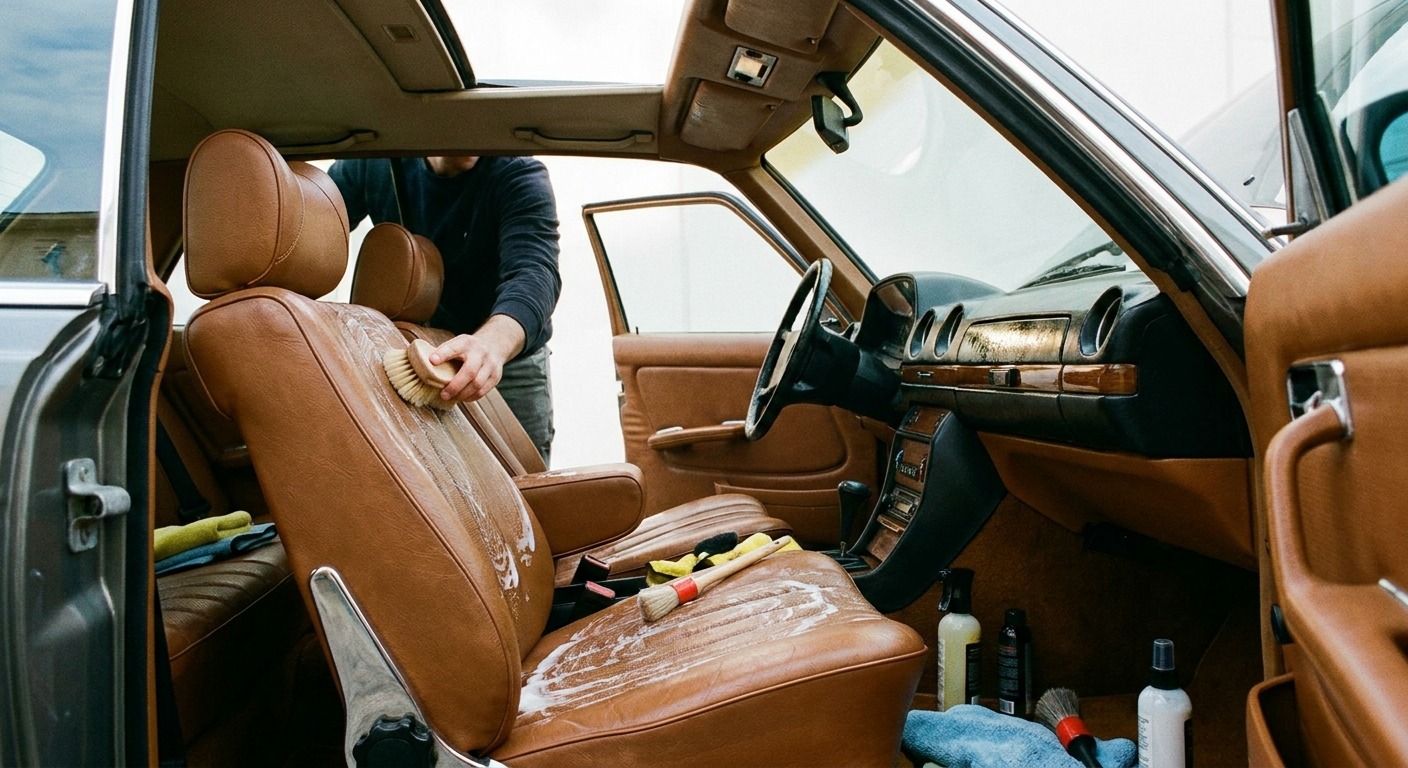
Leather Care
Genuine leather is a natural material that dries out, cracks, and degrades without proper care. Most automotive leather has a protective clear coat (similar in concept to paint clear coat), but that coating wears over time, especially on high-contact areas like the driver's seat bolsters, steering wheel, and armrests.
Cleaning: Use a dedicated leather cleaner, not an all-purpose cleaner. Apply to a soft brush or microfibre towel, not directly to the leather. A soft-bristled horsehair brush gets into the grain texture where grime hides without damaging the surface.
Conditioning: After cleaning, a leather conditioner replenishes oils and moisture. Apply a thin coat, let it absorb for ten to fifteen minutes, then buff off excess. Conditioning prevents the cracking that comes from dryness — especially important in Canadian winters when indoor heating creates very dry air.
Pro tip: The most neglected leather surface in any vehicle is the steering wheel. It's touched constantly, absorbs oils from your hands daily, and rarely gets the cleaning and conditioning it needs. Give it the same attention you give the seats.
Vinyl and Plastic Surfaces
Most of what people think is leather in modern vehicles is actually vinyl or synthetic leather. The dashboard, door panels, centre console, and often the seats themselves are vinyl or hard plastic. These materials are more durable than leather but still benefit from proper cleaning and protection.
Cleaning: An all-purpose cleaner diluted 10:1 handles light cleaning. For heavier grime on door handles and shifter surrounds, go stronger at 4:1. Always apply to a towel or brush, not directly to the surface.
Protection: A vinyl protectant restores colour depth and provides UV protection. Matte-finish protectants look more natural and attract less dust. Glossy ones create that "new car" shine but accumulate dust faster. Either way, apply sparingly — a light coat buffed out beats a heavy application that leaves residue on clothing.
The Dashboard
Dashboards deserve special attention because they take the worst UV exposure of any interior surface. A dashboard baking in summer sun through a windshield gets sustained UV bombardment that degrades vinyl and plastic over time, causing fading, cracking, and that sticky deterioration you see on older vehicles.
Clean the dashboard thoroughly with an all-purpose cleaner and soft brush, paying attention to texture grain and vents. Use cotton swabs or a thin detailing brush for vent slats — they accumulate dust that a regular wipe can't reach. After cleaning, apply a UV-protective dressing. Many enthusiasts prefer water-based dressings for the dashboard since they absorb without leaving a slick surface that could create reflections in the windshield — a genuine safety concern on sunny days.
The Headliner: Handle With Care
The headliner is the one interior surface that intimidates people, and that caution is warranted. Most headliners are a thin fabric glued to a foam backing attached to the roof structure. The adhesive between the fabric and foam is the weak point — aggressive cleaning, excessive moisture, or vigorous scrubbing can separate the layers and create sagging, bubbling, or permanent staining.
For light dust: A lint roller or soft brush with gentle strokes is enough. Don't scrub.
For stains: Lightly mist a small amount of upholstery cleaner onto a clean microfibre towel — not onto the headliner itself — and gently blot the stain. Work from the outside of the stain inward to prevent spreading. Blot dry with a clean towel immediately. Never saturate the headliner with liquid.
For heavy soiling: If the headliner is badly stained — cigarette smoke is the usual culprit — a hot water extractor used carefully on the lowest pressure setting can help, but you're walking a fine line between cleaning and causing delamination. Many detailers treat heavily soiled headliners as a "manage expectations" situation rather than a guaranteed full restoration.
When in doubt with a headliner, do less. A slightly stained headliner that's still properly adhered is better than a spotless one that starts sagging a week later.
Cloth Seats and Carpet
Fabric upholstery and carpet need regular vacuuming and periodic deep cleaning. The approach depends on the severity of soiling.
Regular maintenance: Vacuum cloth seats and carpet thoroughly at every detail. A stiff-bristled brush run over the fabric before vacuuming loosens embedded dirt and lifts the nap of the fabric, making the vacuum more effective.
Spot cleaning: For individual stains, a dedicated fabric cleaner sprayed onto the stain and agitated with a brush, then blotted with a towel, handles most situations. Work from the outside in. Don't soak the fabric — you want the cleaner to work, not to saturate the cushion underneath.
Deep extraction: For seriously dirty cloth seats and carpet, a hot water extractor is the correct tool. These machines spray hot water and cleaning solution into the fabric and immediately vacuum it back out, pulling deep-set dirt and stains with it. The results are dramatic — water extracted from seats that look "clean" often comes out disturbingly dark. Extraction should be done once or twice a year for daily drivers, or any time you're dealing with significant staining.
Floor mats should be pulled out and cleaned separately. Carpet mats can be extracted or scrubbed with a stiff brush and carpet cleaner. Rubber or all-weather mats can be scrubbed with all-purpose cleaner and a brush, rinsed, and dried. Canadian winters make all-weather floor mats almost mandatory — the salt, sand, and slush that come in on your boots will destroy carpet mats in a single season.
Interior Glass
Interior glass is one of the most overlooked surfaces and one of the most satisfying to clean properly. That haze on the inside of your windshield — the one that makes oncoming headlights blur and flare at night — is a film of outgassing from vinyl and plastic interior components, combined with oils and moisture from the cabin environment.
Technique: Use a dedicated automotive glass cleaner — not household window cleaner, which contains ammonia that damages tinted windows. Spray onto a lint-free microfibre towel, not onto the glass. Wipe in one direction, then flip the towel and buff dry. A glass cleaning tool with a pivoting head makes the windshield much easier.
Streak prevention: Use a glass-specific microfibre towel (thinner and tighter-woven than general-purpose) and do a final buff with a dry towel. Work in shade — sunlight causes the cleaner to evaporate before you can buff, leaving streaks.
Piano Black Trim
Glossy black plastic trim — the bane of modern interior design — shows every fingerprint, dust particle, and micro-scratch instantly. It's the hardest interior surface to keep looking clean.
Clean it with a damp, soft microfibre towel, then follow with a spray detail product designed for glossy surfaces. Some detailers apply a light ceramic spray coating to piano black trim to make it easier to clean and more resistant to fingerprints. Avoid rough towels and aggressive wiping — piano black scratches almost as easily as paint.
Odour Elimination
Bad odours in a vehicle have a source, and masking them with air fresheners is a temporary fix at best. Effective odour elimination means finding and removing the source, then treating whatever materials absorbed it.
- Food and beverage spills: Extract the affected area with a hot water extractor. Enzyme-based cleaners break down organic material causing the odour.
- Cigarette smoke: The hardest odour. Smoke permeates every soft surface and the HVAC system. Full extraction, headliner cleaning, and an ozone treatment give the best results. Ozone generators work but the vehicle must be unoccupied and aired out thoroughly after.
- Mildew and mould: Find and fix the water source first (leaky seal, clogged sunroof drain). Clean affected areas with an antimicrobial cleaner and extract carpet and padding.
- Pet odour: Enzyme cleaners designed for pet odour work well on seats and carpet. Extract after application. For ongoing pet passengers, a seat cover that gets washed regularly is the practical long-term solution.
Putting It All Together
A full interior detail follows a logical order: vacuum everything first, clean from top to bottom (headliner, upper panels, seats, lower panels, carpet), then protect (condition leather, dress vinyl and plastic, clean glass last). Working top to bottom means any cleaner drips or debris falls onto surfaces you haven't cleaned yet.
The time investment for a thorough interior detail is two to four hours for a typical sedan, longer for SUVs and trucks. It's a significant commitment, but the result — a cabin that looks, feels, and smells genuinely clean — makes the daily driving experience noticeably better.
Pair a detailed interior with a properly maintained exterior — good wash technique, regular decontamination, and solid paint protection — and you have a vehicle that holds its value and is genuinely pleasant to own, regardless of age or mileage.