Gel Coat Restoration: Bringing Faded Fibreglass Back
How to restore faded and oxidized gel coat on fibreglass boats. Wet sanding, compounding, polishing, and long-term protection for Canadian boaters.
There is something deeply satisfying about bringing a dull, chalky boat hull back to a deep, glossy finish. Gel coat restoration is one of those jobs where the results are dramatic and immediate. You go from a boat that looks like it belongs in a salvage yard to one that turns heads at the marina. But getting there requires understanding what gel coat actually is, why it fails, and how each step in the restoration process builds on the last.
If you have already read our piece on marine oxidation removal, you know the basics of what causes that chalky appearance. This guide goes deeper into the full restoration process, from severely degraded gel coat all the way through to long-term protection.
What Gel Coat Actually Is (And Why It Matters)
Gel coat is not paint, and treating it like paint is where most people go wrong. It is a pigmented polyester or vinylester resin, applied to the mould before the fibreglass laminate is laid up, as described in the gel coat overview on Wikipedia. On most boats it is between 15 and 25 mils thick when new, which sounds like a lot until you realize that compounding and polishing remove some of that thickness permanently. A typical restoration might remove 1 to 3 mils. That matters when a boat might see ten or fifteen restorations over its lifetime before the gel coat is too thin to work with.
The resin in gel coat is softer than automotive clear coat. It is more porous, more UV-sensitive, and more prone to chemical absorption. This is why marine-specific products exist. Automotive compounds work, but formulations designed for gel coat account for its softer nature and typically have more aggressive cut at lower abrasive grades.
Assessing Oxidation: The Stages of Decline
Gel coat degradation happens in predictable stages, and your restoration approach depends entirely on where your boat falls on this spectrum.
- Stage 1 — Light haze: The finish looks slightly dull compared to new. A hand-applied cleaner wax restores the gloss. You might not even notice this stage unless you park next to a brand-new boat.
- Stage 2 — Visible dullness: The colour is noticeably faded. Running your hand across the surface leaves a light chalky residue on your fingers. A single-step machine polish with a medium-cut compound brings it back.
- Stage 3 — Heavy oxidation: The surface is chalky white regardless of the original colour. The pigment layer is degraded. This requires aggressive compounding, possibly multiple passes with decreasing abrasive grades, followed by polish.
- Stage 4 — Structural damage: The gel coat is cracked, crazed, or worn through to the laminate in spots. At this point, you are looking at gel coat repair or a full repaint rather than a polish-based restoration. Compounding a Stage 4 hull will just make it shinier while still looking terrible.
To test where your boat falls, pick an inconspicuous area and try a cleaner wax by hand. If the colour returns easily, you are at Stage 1 or 2. If it takes heavy pressure and multiple passes with no improvement, you are at Stage 3 or beyond.
Wet Sanding Gel Coat: When and How
Wet sanding terrifies people, and honestly, a healthy respect for the process is appropriate. You are cutting into the gel coat with abrasive paper, and there is no undo button. But for Stage 3 oxidation, wet sanding before compounding produces results that compounding alone cannot match.
Start with the least aggressive grit that makes progress. For heavy oxidation on gel coat, that usually means 1000-grit wet/dry paper used with a sanding block and plenty of water. The water acts as a lubricant and carries away the slurry. Keep the paper flat, use even pressure, and work in a cross-hatch pattern to avoid creating grooves. Move to 1500-grit, then 2000-grit, then 3000-grit. Each successive grit removes the scratch pattern from the previous one.
Tip: On coloured gel coat, wet sand a test spot first. Dark colours show sanding marks more readily than white. If you are new to wet sanding, practice on an old fibreglass panel or a section of hull that is normally below the waterline and covered by antifouling paint.
After wet sanding through the grits, the surface will look uniformly hazy. That haze is the sanding scratch pattern from your finest grit, and compounding will remove it. This is the point where people panic because it looks worse than when they started. Trust the process.
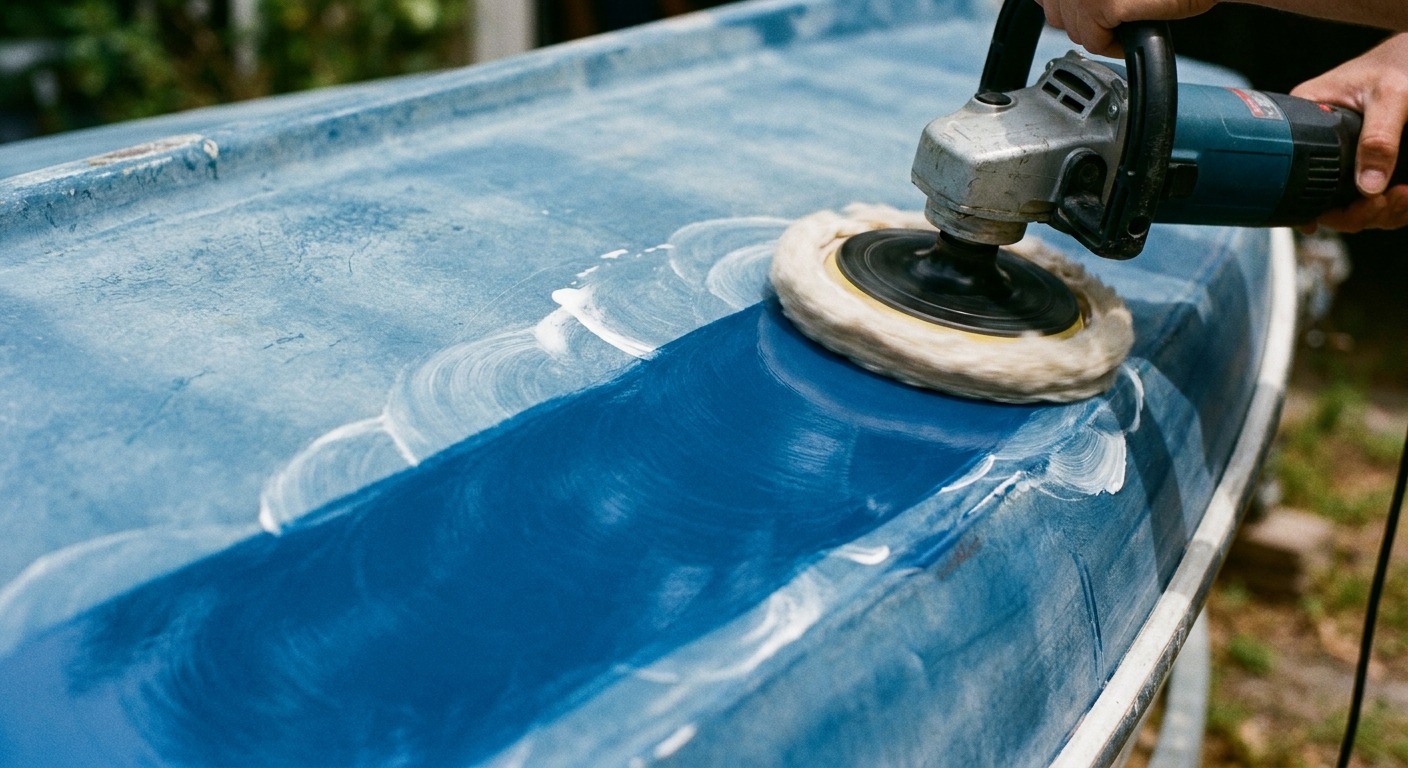
Compound Selection and Machine Polishing
Compound selection for gel coat is slightly different than for automotive clear coat. Marine compounds tend to have longer working times because you are often polishing large, flat surfaces in direct sun, and the compound needs to stay workable. The abrasive technology matters too. Diminishing abrasive compounds that break down from a heavy cut to a fine polish during the working cycle are ideal because they reduce the number of steps.
For machine choice, a dual-action polisher is the safer option for gel coat work, and we break down why in our DA vs rotary comparison. A DA will handle Stage 2 and most Stage 3 oxidation. For deeply neglected hulls that have been wet sanded, a rotary polisher in experienced hands gets through the sanding marks faster, but the risk of burning through gel coat is real. Gel coat is softer than automotive clear, so the heat threshold is lower.
Work in two-foot by two-foot sections. Apply compound to the pad, spread it at low speed, then increase to your working speed. Keep the pad flat to the surface and moving constantly. Gel coat generates heat faster than automotive finishes, so monitor your speed and pressure. After compounding, wipe the residue with a clean microfibre towel and assess. If the colour depth has returned and the surface is glossy, you can move to a finishing polish. If it is still hazy, another compounding pass is needed.
Polishing and Refining the Finish
After compounding, a finishing polish removes the micro-marring left by the compound and brings the surface to full gloss. Use a softer pad, a finer polish, and lighter pressure. This step is faster than compounding because you are refining rather than cutting. On white gel coat, the difference between compounded and polished might be subtle. On dark colours, it is dramatic. A dark blue or black hull that has been compounded but not polished will show swirl marks in direct sunlight. The polish step eliminates those.
Inspect your work with a bright LED light at an angle. This is the same technique used in automotive paint correction and it reveals defects that are invisible in diffused light. Any remaining swirls or haze mean another pass with the finishing polish.
Protection: Wax, Sealant, or Ceramic
You have just invested hours in restoring your gel coat. Leaving it unprotected is madness. The protection layer determines how long your restoration lasts before oxidation starts creeping back.
Traditional marine paste wax is the most accessible option. It provides good UV protection and water beading for six to ten weeks depending on conditions. The downside is that you need to reapply frequently, and on a 30-foot boat, that adds up to a lot of waxing over a season.
Polymer sealants last longer, typically three to five months, and apply more easily. They bond chemically to the gel coat surface rather than sitting on top like carnauba wax. Many boaters layer a sealant under a coat of wax for combined durability and depth of shine.
Marine ceramic coatings are the longest-lasting option, with claims of one to three years depending on the product and conditions. They create a hard, hydrophobic layer that resists UV, chemical staining, and biological growth. The application process demands a perfectly clean surface, controlled temperature, and careful curing. But the reduced maintenance over a Canadian boating season makes it worthwhile for boaters who want weekends on the water rather than polishing the hull. We cover ceramic protection in our ceramic coating guide.
The best protection is the one you actually reapply on schedule. A paste wax applied faithfully every six weeks outperforms a ceramic coating that was applied once three years ago and never maintained.
When to Call a Professional
DIY gel coat restoration is absolutely achievable for the average boat owner willing to invest the time and learn the technique. But there are situations where calling a professional makes more sense.
If your gel coat is at Stage 4 with cracks, crazing, or wear-through, you need gel coat repair before any cosmetic work, which involves spraying new gel coat with colour matching expertise. If your boat is over 30 feet and needs heavy compounding, the labour makes professional service more practical. And if you need the boat perfect for a sale or show, a professional marine detailer achieves a more consistent finish across the entire hull.
For anything at Stage 3 or below, a patient DIYer with a decent dual-action polisher, the right compounds, and a free weekend can achieve professional-grade results. The learning curve is forgiving on gel coat because the surface area is large and the material is consistent. Start on the least visible section of hull, refine your technique, and work your way to the parts everyone sees at the dock. For more on working with oxidized marine surfaces, see our oxidation removal guide which covers the testing and assessment process in greater detail.